


Next: The Schedule System
Up: Open Administration for Schools
Previous: The Report Card System
Subsections
The Fee System is designed to provide a school specific Accounts
Receivable (A/R) system to track all student billing and payments.
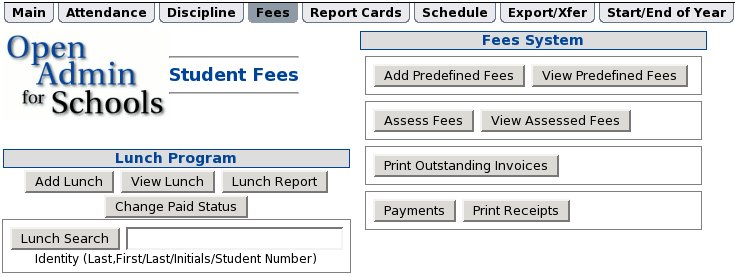
The process is one of:
- Set Predefined Fees (if desired).
- Assess Fees - charge fees to students.
- Print Invoices - notify parents.
- Collect Payments
- Print Receipts (if desired or required).
- Export summary transactions to the school accounting system
periodically (monthly).
Predefined Fees are fees that may be stored along with all of their
characteristics and periodically reused to quickly bill for certain
fees.
The two main operations in this section are to:
- Add Predefined Fees - Add a new fee to be stored with
other fees already defined. The characteristics are outlined below.
- View Predefined Fees - View existing fees. It also allows
for the deletion of any unused fees. There is no edit function since
fees can be easily added and deleted.
Predefined fees have the following characteristics (most of which are
common to other fees as well):
- Name - A short phrase describing this fee or billing item.
- Description - A text field that may be used to describe
the fee in more detail.
- Amount - The monetary value of the item or service.
- Discount - The percentage discount that may apply to
certain individuals or groups (not used currently).
- Tax Flags - The taxes that may apply to this item or
service in your tax jurisdiction. These are defined in your fees
system configuration file and are set by your system admin. OA can
have up to 4 taxes defined. Only values defined in this file will be
visible in the form.
- Group Name - The name of a group of individuals that this
fee applies to. If it can apply to all student then this and the group
value would be left blank. The values of this field include Grade,
Homeroom, Subject-Section, and Student Number. This would allow the
application of this fee to certain groups based on their values in the
group value field.
- Group Value - This may be a single value or a space
separated list of values. If the Group Name above was Grade, then this
list could be a list of grades: 9 10 11 12. If a Subject-Section, it
could be a list of subjects that this applies to: Bio20-1 Bio20-2
Bio30-1 Bio30-3.
- Profiles - These are group names and values that are
stored in the fees system configuration file. They replace the Group
Name and Group Value above with a predefined group. This makes the
creation of predefined values faster and less error prone. If using a
profile, leave the group name and value blank. The profile
value will override any values in these fields.
This allows the addition of new student fees. When the Assess
Fees button is clicked, you have 2 options:
- Create New - to create a new fee from scratch.
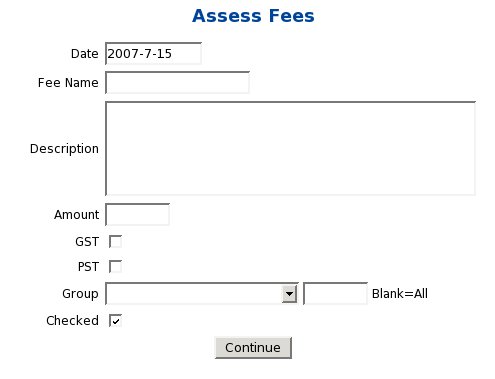
Once you click this button, you can fill in the values:
- Date of this fee.
- Name - A short descriptive name for this fee or item. Words like
tuition, lab fee, textbooks, etc.
- Description - A longer text description of the fee - such as
Tuition - term 1, 2008 or Science Lab Fees - Chemistry.
- Amount - the cost of the item.
- Tax Checkboxes - depending on your jurisdiction, there may be
from zero(0) to four (4) tax checkboxes that are applied to the amount
above. If you have no taxes, no check boxes will appear. These are the
taxes that will be added on to the above amount.
- Group - the group of students that this fee applies to. The
selection list includes grade, homeroom, and student number. If you
select grade and put a space separated list (10 11 12) then all
students from grades 10 to 12 may have this fee applied to them. Later
screens will allow you to unselect certain students from these
grades. If only certain students have this fee applied you may leave
this blank and only select certain students in later screens. You
choose whichever method is faster for you.
- Checked - if checked, the next screen with student names will be
all selected. If this box is unchecked, then the snext screen
will have none selected.
- Use Predefined - Clicking this button presents you with a
list of the predefined fees. You click the select button for one of
them and continue on to the next screen showing student lists and the
characteristics of this fee.
The next screen will show your entered values for fees and a list of
all students this fee may apply to.
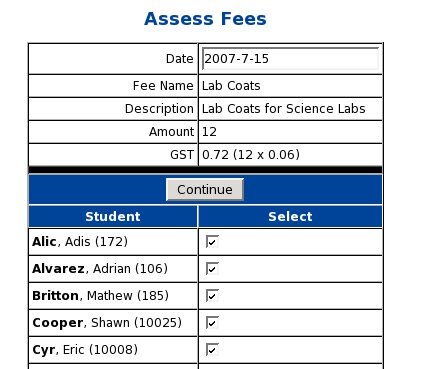
This screen shows the options chosen in the previous screen (including
a gst tax) for lab coats, and then a list of selected
students. Unselect students this doesn't apply to and click the Continue button at the bottom of the screen.
The final screen confirms the storage of the fee records and provides
links back to the main fees system page or to allow the addition of
more fees.
View Assessed Fees is a simple viewing script to show the
current fees journal files (and also looks up the student name in the
second column). It will be replaced with a more sophisticated script
based on school needs.
The Print Outstanding Invoices is a script to create paper based
(pdf) invoices for delivery to parents.
The first screen requests the date to appear on the invoices. The
second screen provides the link to download the generated pdf (and
print them, if desired). The View Log File link provides access
to the log file generated along with the pdf (and will contain any
errors in the process.
The invoice pdf prints only outstanding fees due. It is a single page
per student report. It includes the values for each outstanding fee
and a total at the bottom. Simple stuff.
The payments script starts out with a student search with the usual
lastname, firstname or lastname or initials or
student number input. Once entered, the search results screen shows
all matching students with an Accept Payment button for each.
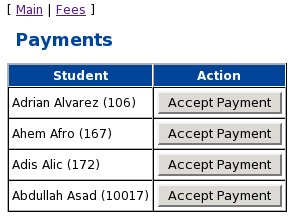
Once one of the buttons is clicked, the next screen provides
information about the outstanding fees and the total amount due.
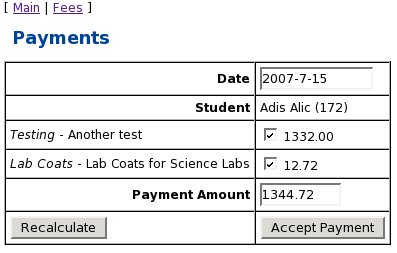
The payment date is the date of payment (normally today). The next
line identifies student (including local student number). The next
line(s) list the outstanding fees and the name, description, and
amount of each. A checkbox indicates that this fee is to be paid.
If are not going to pay that fee, uncheck the box. Then click the
recalculate button and the total payment will be recalculated. The
screen now looks like the one below:
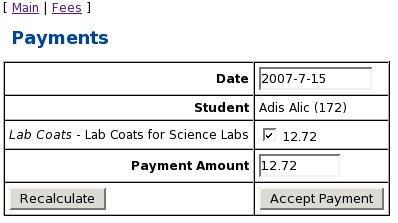
Once you click the Accept Payment button, the payment is made
and all fees are marked as paid. The next screen confirms payment and
provides a link to print out a receipt for this payment (although this
may be done later also).
Your payment is now complete.
Print Receipts - a script to allow student searches, and the
printing of individual receipts.
This script will export monthly summary transactions so that they may
be imported into an accounting system used by the school. The
summaries are downloaded in a CSV (Comma Separated Value) format that
can easily be imported into accounting systems or spreadsheets.
There are 2 simple steps in using the script. The first is to indicate
the year and month you wish to export. It will default to the current
month if near the end of the month and to the previous month if near
the start of the month. You enter in a yyyy-mm format (no day of month
is required).
The second step is to click on the link and download the CSV file and
save it on your local computer to input this information into your
accounting system. The fees system is designed to provide simple A/R
(Accounts Receivable) functions.
The fees subsystem workflow is:
- Fees are charged to students. These could include tuition,
books, labs, etc. Each fee adds a record to the fees journal
(fees_jrl) and fills in the id, studnum (student number), transaction
date (trans_date), transaction type (trans_type is chg), and
information about the fee (name, description, subtotal, and the
shortnames and values for up to 4 taxes, and then a total for these
values).
The paid field (paid_id) remains NULL. This field holds the id of the
payment record when payments are made.
- The invoicing process is simply a reporting process. Print
invoices will normally be run and mailed. The parent site should also
allow viewing of outstanding charges, etc.
- The payment process will create a new payment transaction record
in the fees journal (fees_jrl). It will only fill in limited fields
and leave the rest NULL. The fields added are id (auto), student
number (studnum), date of payment (trans_date), and a transaction
type (trans_type) = pay. The name field will be Payment
(or alternate language equivalent). The total field will store
the amount of the payment (as a negative number). The description
field lists id's of the fees paid.
The it paid_id field for payments stores the receipt number
for the payment. This number is obtained from the receiptnumber file
in /etc and is incremented for each payment. It works exactly like the
studentnumber file in the same location which holds the next available
student number for student enrollment.
The other fields will remain NULL in the record (subtotal and all tax
fields).
All fees records that are paid will have their paid_id field filled
in with the id of the payment transaction that does this.
- Printing/Reprinting payment receipts
- Find all pay transactions for this student in descending date order.
- Once a particular payment is selected, get it's id and total.
- Find all transactions that have this id in their paid_id fields
(both charge and also roa transaction as well).
- Add them up and make sure they add to the total of the payment.
Verify the total. If not flag an error.
- Now with all of the charge/roa transactions and the single payment
transaction, print out a receipt.
- Printing an Account Statement
- Find all transactions lacking a paid_id value (ie. NULL). These
will all be charge (chg) types and received on account(roa) types. The
roa transactions are created when a payment is larger than the
fees (or is not sufficient to pay all fees). They have the payment id in the
name field. The paid_id field is blank in these records also.
Payment transaction will have the paid_id fields set to the receipt
number.
- Print all of these records out in date order and add to give an
outstanding balance. ROA transactions are also be included since they
will reduce this outstanding balance.
- Printing a historical bill of transactions
- Pick a starting date. Check for any outstanding values before this
date to figure out a starting balance owing for this child.
- Print transactions in date order. If paid, the balance, if any,
will remain unchanged. Unpaid transactions will alter the printed
balance.
- Print total outstanding.
CREATE TABLE fees_jrl (
  id int(11) NOT NULL auto_increment,
  studnum int(11) default NULL,
  trans_date date default NULL,
  trans_type varchar(8) default NULL,
  name varchar(255) default NULL,
  description text,
  subtotal decimal(10,2) default NULL,
  tax1 decimal(10,2) default NULL,
  tax1_name varchar(16) default NULL,
  tax2 decimal(10,2) default NULL,
  tax2_name varchar(16) default NULL,
  tax3 decimal(10,2) default NULL,
  tax3_name varchar(16) default NULL,
  tax4 decimal(10,2) default NULL,
  tax4_name varchar(16) default NULL,
  total decimal(10,2) default NULL,
  paid_id int(11) default NULL,
  PRIMARY KEY  (id)
) TYPE=MyISAM;
The second table stores predefined fees to allow quick application
to particular students or student groups.
CREATE TABLE fees_predefined (
  id int(11) NOT NULL auto_increment,
  name varchar(16) default NULL,
  description varchar(255) default NULL,
  amount double default NULL,
  discount double default NULL,
  tax1_flag char(1) default NULL,
  tax2_flag char(1) default NULL,
  tax3_flag char(1) default NULL,
  tax4_flag char(1) default NULL,
  group_name varchar(32) default NULL,
  group_value varchar(32) default NULL,
  profile varchar(32) default NULL,
  PRIMARY KEY  (id)
) TYPE=MyISAM;
Next: The Schedule System
Up: Open Administration for Schools
Previous: The Report Card System
2010-07-18